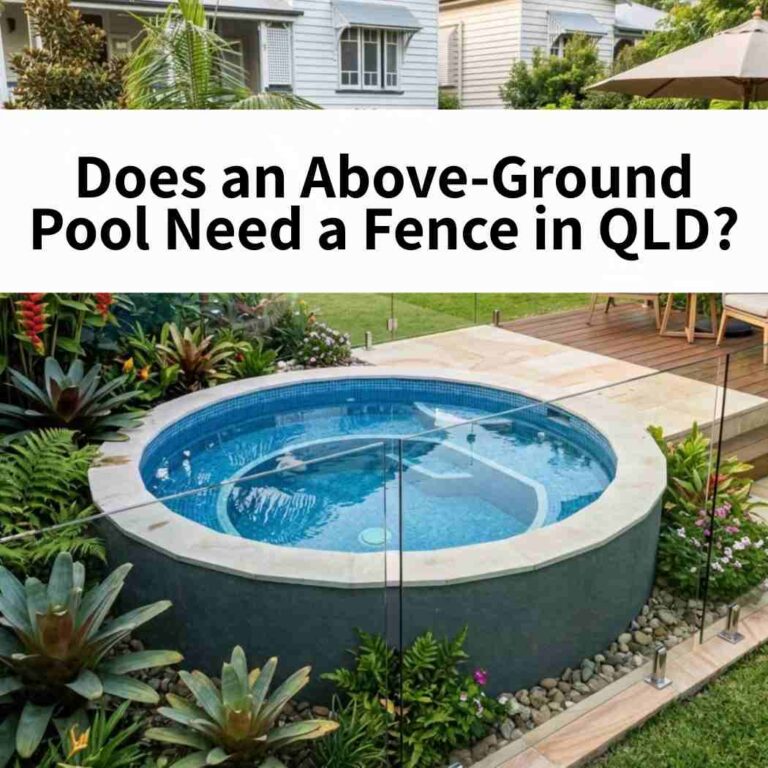
But hold your horses! Just like a pet, a swimming pool is not just for Christmas. It’s a long-term commitment that requires regular care and maintenance. And that’s precisely what this ‘Plunge Pool Guide: Maintenance & Care of Plunge Pools’ is all about.
Key Takeaways:
- Clean your pool regularly by skimming leaves, brush surfaces, and vacuum to maintain water clarity and hygiene.
- Balance water chemistry by keeping pH, chlorine, alkalinity, cyanuric acid, and calcium hardness within ideal ranges.
- Use pool test kits consistently, especially after rainfall or high usage to avoid chemical imbalance.
- Prevent algae proactively by brushing weekly, run the pump longer in warm months, and use algaecides to control growth.
- Stick and follow weekly maintenance routine to keep your plunge pool safe, clean, and ready to enjoy.

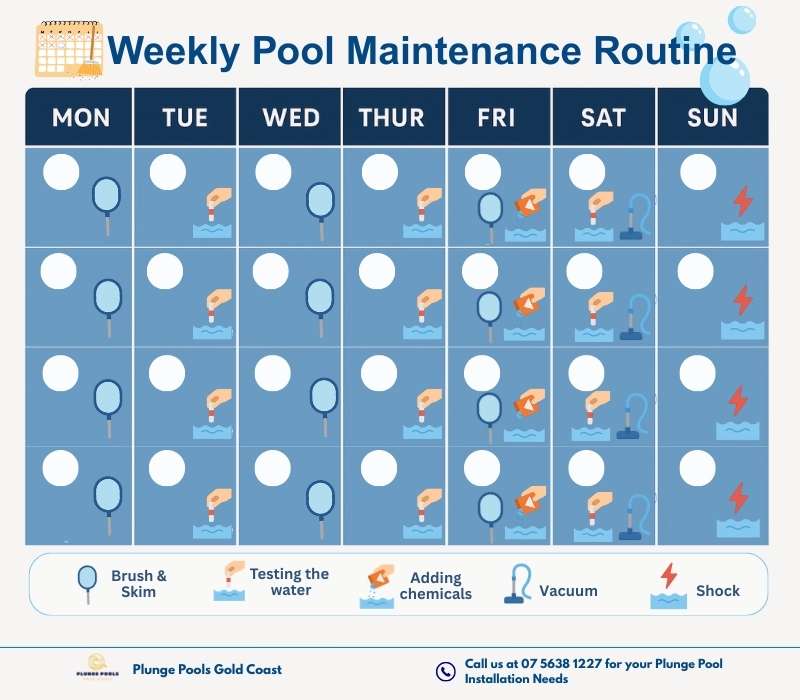
1. Regular Cleanliness is a Must
The key to a pristine swimming pool lies in regular cleaning. This includes skimming leaves, brushing the sides, and vacuuming the floor.
2. Maintaining the Chemical Balance: Understanding Water Chemistry
Maintaining the right balance of chemicals in your pool is a delicate dance. This balance ensures your pool remains a safe and healthy environment.
The first step in mastering pool chemistry is getting to grips with the basics. Here are the essential elements you need to be familiar with:
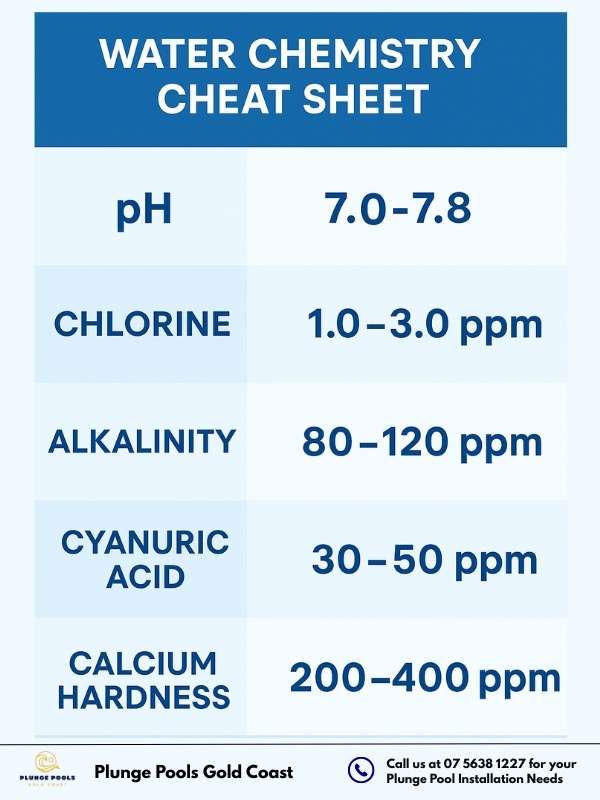
A. pH Levels
pH is a measure of how acidic or alkaline the water is. According to CDC, the ideal pH level for your plunge pool water should be between 7.0 and 7.8. Too low, and the water becomes corrosive, which can damage your pool equipment. Too high, and you might start to see scale formation, cloudiness, and reduced chlorine efficiency.
During the rainy season in Queensland, we noticed that unbalanced rainwater caused the pH in a plunge pool to drop significantly, leading to cloudy water and irritated skin after swims. Weekly testing became crucial during this period.
B. Alkalinity
Alkalinity acts as a pH buffer. It helps to stabilize the pH levels and prevent rapid fluctuations. The recommended total alkalinity for a pool is between 80 and 120 parts per million (ppm).
C. Chlorine
Chlorine is the most common sanitizer used in pools. It kills bacteria, viruses, and algae. According to the CDC, free chlorine levels in a residential pool should be maintained between 1.0 and 3.0 ppm. However, the presence of too much chlorine can cause skin, eye, and respiratory issues.
One of the pool owner said, they once over-chlorinated after a pool party and they had to keep the pool closed for two days. Since then, They’ve used slow-release chlorine tablets and avoided shocking unless absolutely necessary.
D. Cyanuric Acid
Cyanuric acid protects chlorine from being destroyed by the sun’s ultraviolet rays. It should be maintained at 30-50 ppm in outdoor pools.
E. Calcium Hardness
This refers to the amount of calcium in the water. According to County of San Diego, high calcium hardness can cause scaling water, while low levels can lead to corrosion. The recommended range is 200-400 ppm.
3. Striking the Perfect Balance
Now that you know the key elements of water chemistry, let’s talk about how to maintain your pool at the right levels.
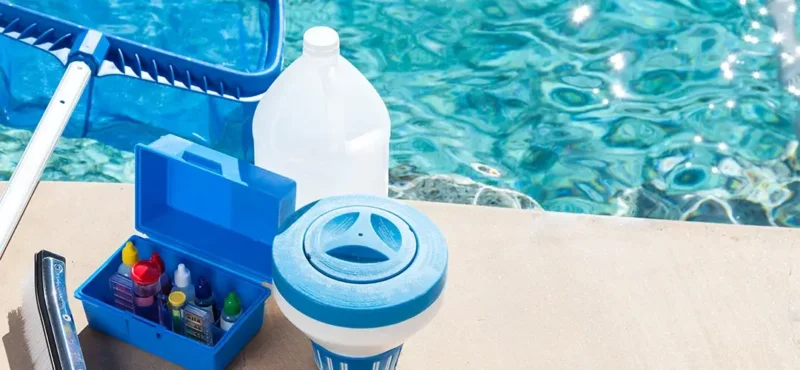
A. Regular Testing
One of the most essential steps in maintaining the chemical balance in your pool is regular testing. Pool testing kits are readily available, affordable, and easy to use. Test your pool water at least once a week, and more often during peak use or after heavy rainfall.
B. Adjusting Chemical Levels
Once you’ve tested the water, you can then adjust the chemical levels accordingly. To raise or lower pH levels, you can use pH increasers or decreasers, which are commonly available at pool supply stores. To adjust chlorine levels, you can add more chlorine or use a chlorine neutralizer. Remember, always follow the manufacturer’s instructions when adding chemicals to your pool.
C. Professional Help
While you can do much of the chemical maintenance yourself, it’s a good idea to occasionally get your water professionally tested. Pool service companies have access to more sophisticated testing equipment, which can provide a more comprehensive analysis of your pool water.
Maintaining the chemical balance of your plunge pool might seem complicated at first, but with a little practice and understanding, it can become as routine as skimming leaves off the surface. Remember, a well-maintained pool is a safe and enjoyable pool. So, arm yourself with knowledge, stay vigilant, and happy swimming!
Get a Professional Help ➔4. Keep an Eye on Water Levels
Water levels in your plunge pool should be kept approximately 100-150mm lower than the top of the pool.
5. Dealing with Plunge Pool Issues
Even the most meticulously maintained plunge pools can sometimes face issues. After all, they are complex systems subject to a myriad of internal and external factors. Leaks, cloudy water, algae blooms, and equipment malfunctions can all disrupt your plunge pool paradise. But don’t let these potential problems dampen your spirits.
A. Leak Detection
A leak in a plunge pool can cause big problems from higher water bills and broken equipment to long-term structural issues. But unlike normal evaporation, leaks usually leave clues in the pool shell, plumbing, or filtration system. So here’s how you can spot and fix them step by step.
Step 1: Confirm It’s a Leak, Not Evaporation
Before you jump to conclusions, well, rule out evaporation. It’s especially common in hot, dry, or windy weather.
Try the Bucket Test:
- Place a bucket filled with pool water on a submerged step.
- Mark the water level in both the bucket and the pool.
- Wait 24 hours with the pump off.
- If the pool water drops more than the bucket’s, you’ve probably got a leak.
Step 2: Inspect Equipment and Plumbing
Most leaks start in the circulation or filtration system. Check things like:
- Pump and filter housing connections
- Pool heaters or heat pumps
- Valves, unions, pressure fittings
- O-rings and gaskets in the pump lid
Look out for wet patches, rust stains, or even constant drips when the system is off. And if you notice air bubbles in return jets, that can mean a suction-side leak.
Step 3: Examine the Pool Structure
If plumbing checks out, then move on to the pool shell and fittings. Cracks in tile lines, gaps in grout, or issues with the skimmer box can all let water escape.
Use leak detection dye (or even food colouring) to test suspect spots. Turn off the pump, add dye near cracks, joints, or fittings, and watch if the colour gets pulled in, you’ve found the leak path.
Step 4: Assess Interior Surfaces
Sometimes, the problem’s inside. For example, vinyl liners can split or wrinkle. Concrete pools might show hollow spots or hairline cracks. Fibreglass shells often get spider cracks or splits near fittings.
Book a Leak Inspection Now ➔B. Cloudy Water
When your crystal clear plunge pool turns into a cloudy mess, it can be quite a sight for sore eyes. Cloudiness is typically a sign of imbalanced water chemistry, inadequate filtration, or environmental factors.
Balancing Water Chemistry
Plunge Pools require regular testing and adjustment of your pool’s pH, alkalinity, and sanitizer levels can help keep your pool clear. Shocking your pool or using a clarifier can also restore water clarity by clumping together microscopic particles for easier filtration. Get yourself a water testing kit for your backyard pool.
After a windy week that dumped pollen and debris into one of our client’s plunge pool, the water turned murky. They learned that running the pump for a longer duration and using a clarifier restored the clarity within 48 hours.
Improving Filtration
Ensuring your filtration system is working efficiently is key to avoiding cloudy water. Regularly clean and backwash your filter, and make sure your pump runs for an adequate amount of time each day.
C. Algae Blooms
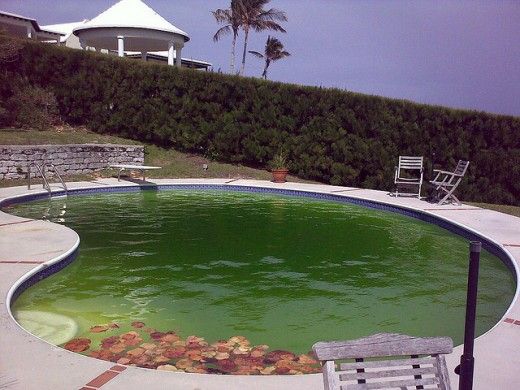
Algae in a plunge pool isn’t just ugly, it can make surfaces slippery, clog filters, and even cause skin or eye irritation. That’s why controlling algae means mixing prevention with treatment, plus regular water care. And you’ll need to keep sanitiser levels right, circulation steady, and chemicals balanced.
Types of Algae and What They Mean
Now, knowing the type of algae really helps pick the best treatment:
- Green algae – The most common type; makes water look cloudy or pea-green.
- Yellow (mustard) algae – Sticks to shaded walls and steps; tough against normal chlorine.
- Black algae – Forms dark spots in grout or plaster; very stubborn, usually needs several shocks with algaecides.
Step-by-Step Algae Prevention Strategy
1. Maintain Sanitiser Levels
Keep free chlorine around 1.0–3.0 ppm. Also, use cyanuric acid to protect chlorine from sunlight, and test water often with strips or a digital tester.
2. Brush Pool Surfaces Weekly
For example, nylon brushes work best for vinyl or fibreglass pools, while concrete and tiled ones need stiff bristles. Focus on corners, steps, ladders, and skimmers because that’s where algae loves to hide.
3. Ensure Proper Circulation
Run the pump 8–12 hours in summer. Plus, angle return jets for circular water flow to avoid dead spots. Clean baskets and check impellers too.
4. Shock the Pool Weekly
After heavy pool use or rain, add calcium hypochlorite or a non-chlorine oxidiser.
5. Add Preventative Algaecide
Finally, a weekly dose of polyquat 60-based algaecide helps a lot, especially in warm, humid weather.
One of our installed pool client said, “In my backyard plunge pool surrounded by bamboo, I fought green algae every summer. I finally solved it by running the pump an extra 2 hours daily, brushing every other day, and using a polyquat algaecide weekly. Haven’t seen a bloom since.”
If Algae Has Already Taken Hold
- Balance Water Chemistry – Adjust pH to 7.2–7.4, alkalinity to 80–100 ppm.
- Brush Thoroughly – Scrub every inch, even clean-looking spots.
- Apply High-Dose Shock – Green: 10 ppm. Yellow: 15 ppm. Black: 30 ppm, sometimes repeat shocks. Keep pump running for 24–48 hours.
- Apply Specialised Algaecide – Mustard or black algae algaecides.
- Vacuum to Waste – Manually vacuum algae to waste line.
- Clean or Backwash Filters – Hose cartridges or backwash sand/DE filters.
Post-Treatment Monitoring
For the next week, test water daily, stabilise chlorine, and watch closely for regrowth. Then, return to weekly brushing, shocking, and sanitiser checks.
D. Equipment Malfunctions
When your plunge pool equipment fails to function, it can cause a ripple effect of problems in your pool. Regular maintenance is key to preventing this.
Regular Maintenance and Inspections
Ensure that your pool’s pump, filter, and heater are regularly serviced according to the manufacturer’s instructions. Be alert for any signs of malfunction, such as unusual noises, leaks, or a drop in performance.
Filter Maintenance:
The pool filter is like the heart of your plunge pool, it keeps the water fresh by catching dirt, debris, and even tiny particles you can’t see. But when the filter’s ignored, the water can turn cloudy, circulation slows, and you might even end up with algae or damaged equipment. That’s why regular care is so important, no matter if you’re using a cartridge, sand, or diatomaceous earth (D.E.) filter.
Types of Pool Filters and How to Maintain Them
- Cartridge Filters
So here’s the deal, water runs through a pleated polyester cartridge that traps oils, pollen, and dust.
- Weekly: Check the pressure gauge. If it’s 8 -10 PSI above the normal level, time to clean.
- Monthly: Switch the pump off, release pressure, then pull the cartridge out. Next, hose it down at a 45° angle. For stubborn buildup, just soak it overnight in a cleaner or diluted acid, then rinse before putting it back.
- Replacement: Every 1 – 2 years, or sooner if pleats look flat, torn, or badly stained.
- Sand Filters
Water passes through silica or glass media, catching dirt along the way. These filters are tough, and you’ll find them in many plunge pools.
- Weekly: Watch the pressure gauge. Backwash when it’s 7-10 PSI above normal.
- Backwashing Steps: Pump off → valve to Backwash → run until sight glass clears (2 minutes) → pump off → Rinse for 30 seconds → back to Filter → restart pump.
- Replacement: Every 3 – 5 years, or sooner if channels form.
- D.E. Filters
With these, water is polished ultra-clean by a powder-coated grid, catching particles as tiny as 2-5 microns.
- Biweekly: Backwash once pressure rises 8-10 PSI.
- After Backwash: Add fresh D.E. powder through the skimmer (about 1 lb per 10 sq. ft.).
- Quarterly: Pull the filter apart, soak the grids, rinse well, then reassemble.
- Replacement: Grids usually last 5 – 10 years.
Signs Your Filter Needs Help
Weak jets, cloudy water even after shocking, or stubborn high pressure readings all mean your filter’s crying for attention. Also, if you see bubbles in return jets, it could point to a suction-side leak.
Conclusion
Being a pool owner can feel like a slice of heaven on earth, but remember, it’s not all sunshine and rainbows. It requires regular swimming pool maintenance and care.
The key takeaway is that routine care and timely intervention are the best ways to ensure your plunge pool stays in perfect condition.
And remember, when in doubt, don’t hesitate to call in our professional team. After all, an ounce of prevention is worth a pound of cure. Happy plunging!
Not sure if your plunge pool needs professional care?
Let our certified pool technicians take the guesswork out of maintenance and help you enjoy a crystal-clear swim year-round.
Book Your Free Inspection ➔Frequently Asked Questions
1. How often should I clean my plunge pool?
You should clean your plunge pool every day with a quick skim and check the chemical balance at least once a week. Daily skimming removes leaves, bugs, and surface debris before they sink. Weekly testing and balancing of pH, chlorine, and alkalinity keeps the water safe, prevents algae, and protects your pool equipment.
2. How can I maintain the right water temperature in my plunge pool?
You can maintain the right water temperature in your plunge pool by using a pool cover to prevent unnecessary heat loss. A cover acts as a thermal barrier, trapping warmth overnight and reducing evaporation. For even better temperature control, many homeowners also install energy-efficient pool heaters or heat pumps, which let you enjoy comfortable swimming year-round.
3. Can I use regular household cleaners to clean my plunge pool?
No, you should not use regular household cleaners in your plunge pool. Household cleaning products often contain soaps, detergents, and chemicals that disrupt the pool’s water chemistry, making it unsafe for swimmers and damaging to your equipment. Instead, always use pool-specific cleaning products and approved pool chemicals that are designed to maintain the right pH, chlorine, and alkalinity levels.
For easier upkeep, many owners use an automatic pool cleaner (robotic cleaner) to handle routine debris removal. If you’re unsure which products to buy, your local pool shop can recommend the right chemicals and provide you with a step-by-step pool maintenance guide tailored to your setup.
4. Why is the water level in my plunge pool dropping?
The water level in your plunge pool usually drops because of evaporation, which is completely normal. However, if you notice a significant or sudden drop, it may point to a pool leak. Leaks can occur in the plumbing lines, fittings, or the pool shell itself. To confirm, you can do a simple bucket test by placing a bucket of water beside the pool to compare water loss. If the pool loses water faster than the bucket, you likely have a leak.
5. What can cause the water in my plunge pool to turn green?
Green water in your plunge pool is usually caused by algae growth, which happens when the water chemistry is unbalanced. Low chlorine levels, high pH, or poor filtration allow algae spores to multiply quickly, turning the water cloudy or green. Warm weather and lack of circulation can make the problem worse. To fix it, you’ll need to shock the pool with chlorine or algaecide, brush the walls and floor, and run the filter until the water clears.
Regular testing of pH, chlorine, and alkalinity, combined with proper cleaning and circulation, helps prevent algae growth and keeps your plunge pool water crystal clear.
6. What should I do if I notice cracks in my plunge pool?
If you notice cracks in your plunge pool, you should contact a pool professional straight away. Even small cracks can allow water to seep out, leading to structural damage, leaks, and costly repairs if ignored. Cracks may appear in the pool shell, tiles, or coping, and while some hairline cracks are cosmetic, others can signal deeper structural issues. A professional can inspect the damage, seal minor surface cracks, or recommend repairs such as resurfacing or structural reinforcement if needed.
Addressing cracks early not only prevents further damage but also extends the lifespan of your plunge pool and ensures it remains safe to use.